Course Software & Tools
In this course, we will be utilizing a number of different software platforms and tools. Some of the tools are optional, but are highly recommended. Setting up some of these tools will be easy, but others will expose you to some of the more frustrating aspects of working with computers. The best representation of what I’m talking about is this xkcd comic, entitled Dependency.
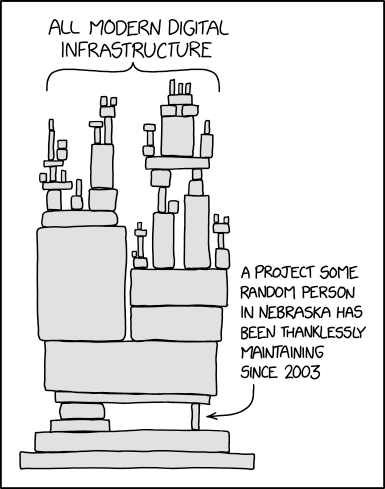
Essentially, modern software is a bit of a house of cards, and it’s not uncommon to spend hours trying to get something to work, only to find out that you were missing a single character in a configuration file or have some conflicting dependency. The key thing to know is that this is not a reflection of your ability to work with computers, but rather a reflection of the state of modern software. In fact, an HCI professor wrote an excellent post about how this type of configuration errors can deter students (you can read a bit about that here https://www.kevinbrowne.ca/command-line-bullshittery-and-other-realities-of-computing/). There’s also this great free MIT resources called The Missing Semester of Your CS Education https://missing.csail.mit.edu/2020/course-shell/ and https://missing.csail.mit.edu/2020/command-line/ that covers some of what we will be doing here if you would like more background information.
The remainder of this page contains installation instructions for the tools/software/programming languages we will be using in this course, listed in order of complexity of installation. Most of the links are operating system agnostic, but if indicated, please follow the instructions for your computer type (Windows = any computer running windows, Mac = any apple computer). Most of the instructions involve clicking on links to download programs, though a few also require you to paste text into your computer.
You should do your best to get through the majority of the installation instructions before our next class, but if you get stuck, please reach out to the instructor via Slack (especially if you’ve been trying for more than ~20 minutes) and also know that we will have time in our Thursday class session to help troubleshoot any installation issues. Again, any issue you face is a feature of the difficulty of working with computers, not a reflection or indication of your ability to code.
Slack
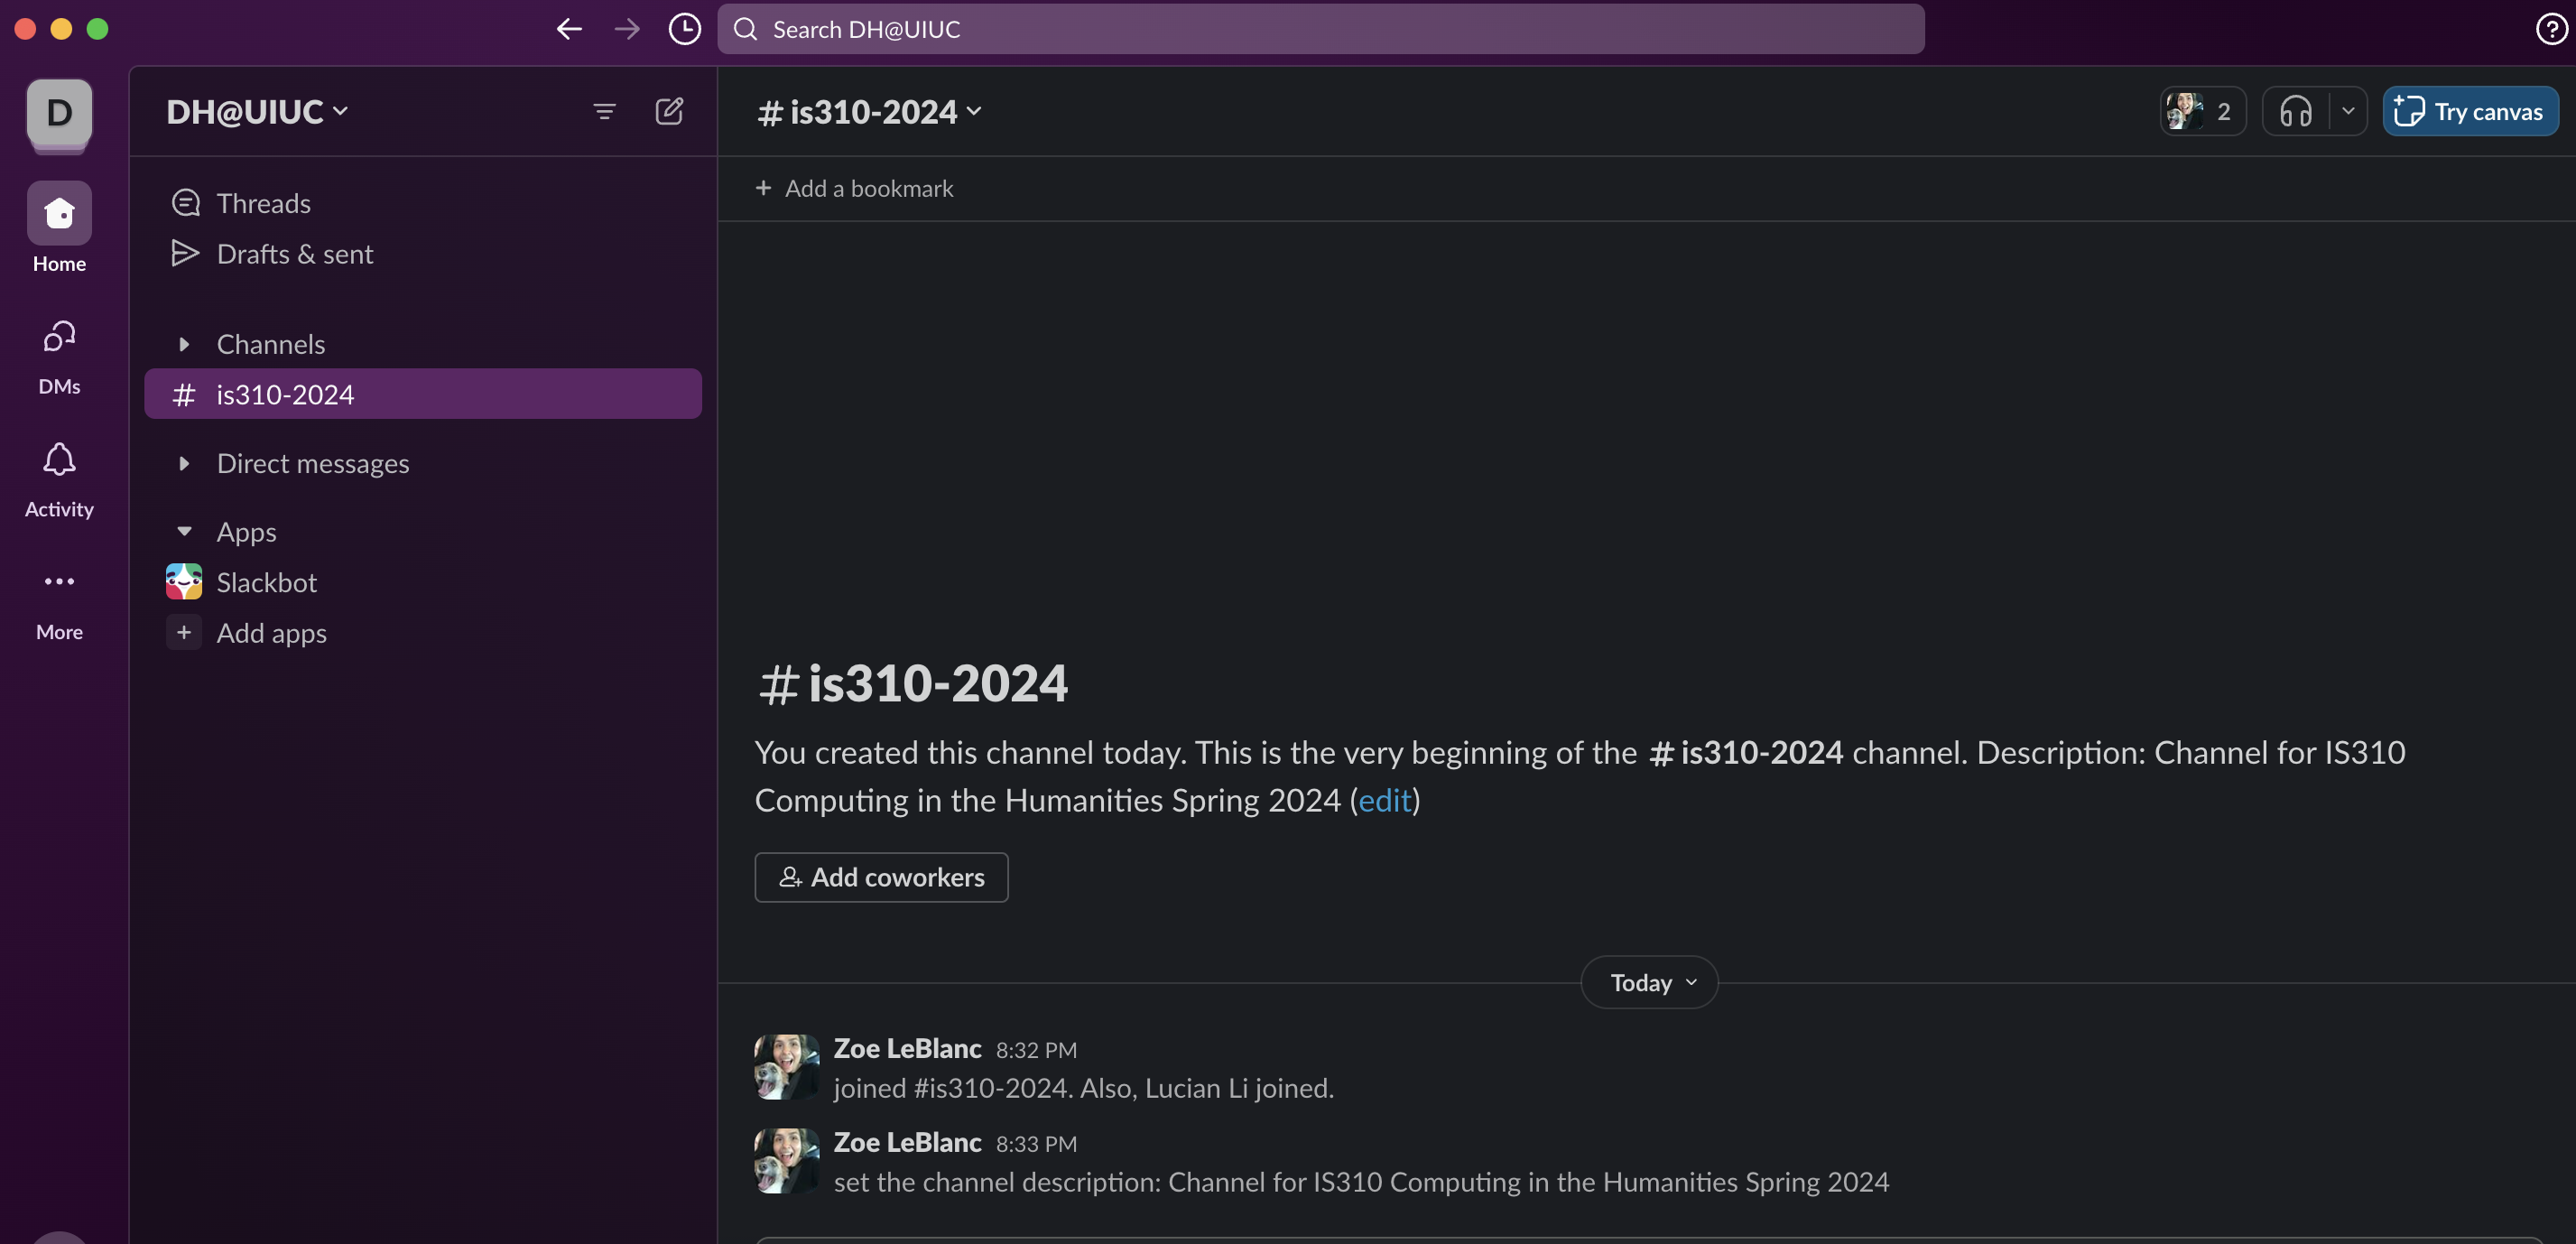
Slack is a communication tool that we will use for this course. You can download the app for your computer or use the web version. You can also download the app for your phone. You will need to create an account and join the course channel is310-2024-b on DH@UIUC team. The link to join Slack is available on Canvas and in the syllabus, and you can add yourself to our channel or ask the Instructors for assistance.
I realize that Slack is less popular than a platform like Discord, but it is a very popular platform for Digital Humanities. In fact, the primary DH Slack Team is a great place to ask questions and get help from other DHers. You can read more about it and how this field uses Slack in this writeup by Amanda Visconti https://literaturegeek.com/2016/07/06/digital-humanities-slack-community-design.
You are welcome to make any username you want, but please be sure to share who you are in the course channel so we can all get to know each other.
Hypothesis
For our collective annotations, we will be using the Hypothesis platform. You can sign up for Hypothesis here hypothes.is/signup and join our collective group at the link in our syllabus or via Canvas. You will need to install the Hypothesis Browser Extension for your preferred browser as well. You should follow the instructions available in this Quick Start Guide https://web.hypothes.is/help/quick-start-guide/.
You are welcome to make your username whatever you choose, but please share your username with the instructor. And please be sure to make your annotations in our hypothes.is group https://hypothes.is/groups/Y9VvDj6x/is-310-fall-2024 and that these annotations are public. For more about using Hypothesis groups, see this guide https://web.hypothes.is/help/annotating-with-groups/.
GitHub

If you do not already have a GitHub account, you will need to sign up for an account for this course. For those unfamiliar, GitHub https://github.com/ is a web-based platform that allows you to host and version code-related projects, while also working collaboratively. The best analogy is to imagine a blend of a data management and collaborative work platform like Google Drive with a social media platform like Twitter. It uses Git, a version control system, which is somewhat confusingly different from GitHub, to manage the history of a project.
GitHub is free to use (part of its popularity) and once you have an account you can store code and related materials (like datasets, for example) remotely, while also working collaboratively on these materials. The platform primarily consists of users, organizations (which users can join), and repositories (often called “repos” that are akin to folders or directories) for storing materials. In many ways, GitHub is similar to Google Drive, allowing users to both upload, organize, and keep versioned histories of their files. However, unlike Google Drive or other research management platforms, GitHub is also a platform for social coding, where users can publicly work on projects together, follow one another, comment on each other’s work, and view each other’s activity (somewhat like Twitter, Mastodon, Bluesky, etc…).
We will be delving into GitHub’s functionality in the next few weeks, but first you will need to sign up for an account. You can sign up for an account here https://github.com/join. GitHub provides additional documentation on signing up for an account. In terms of selecting a username, I would recommend choosing something that you plan to use professionally.
Once you have an account, you will also need to sign up for the GitHub Education Global Campus account https://education.github.com/benefits. You can find step-by-step instructions on how to sign up here https://docs.github.com/en/education/explore-the-benefits-of-teaching-and-learning-with-github-education/github-global-campus-for-students/apply-to-github-global-campus-as-a-student, but you will need to use your @illinois.edu email and show proof of your student status (either ID or academic record).
Getting approved might take a few days, but once you are approved, you will be able to not only create private repositories for free (we will get into what repositories are soon), but also use GitHub’s AI coding tool called Co-Pilot.
Both GitHub and Co-Pilot are owned by Microsoft, which acquired the platform in 2018 for 7.5 Billion dollars1, and the platform has become the de facto platform for hosting code, with the platform recently announcing that they had over 100 million of users.2
**Please download and install https://desktop.github.com/download/ as well. This will greatly simplify the process of managing different projects. **
Why Use GitHub for Digital Humanities/Computing in the Humanities?
While primarily marketed towards software developers, GitHub is also incredibly popular for digital humanities. It is widely used for hosting data sets, text corpora, and other scholarly research assets. It provides a central place to publish, discover, and collaborate on such resources.
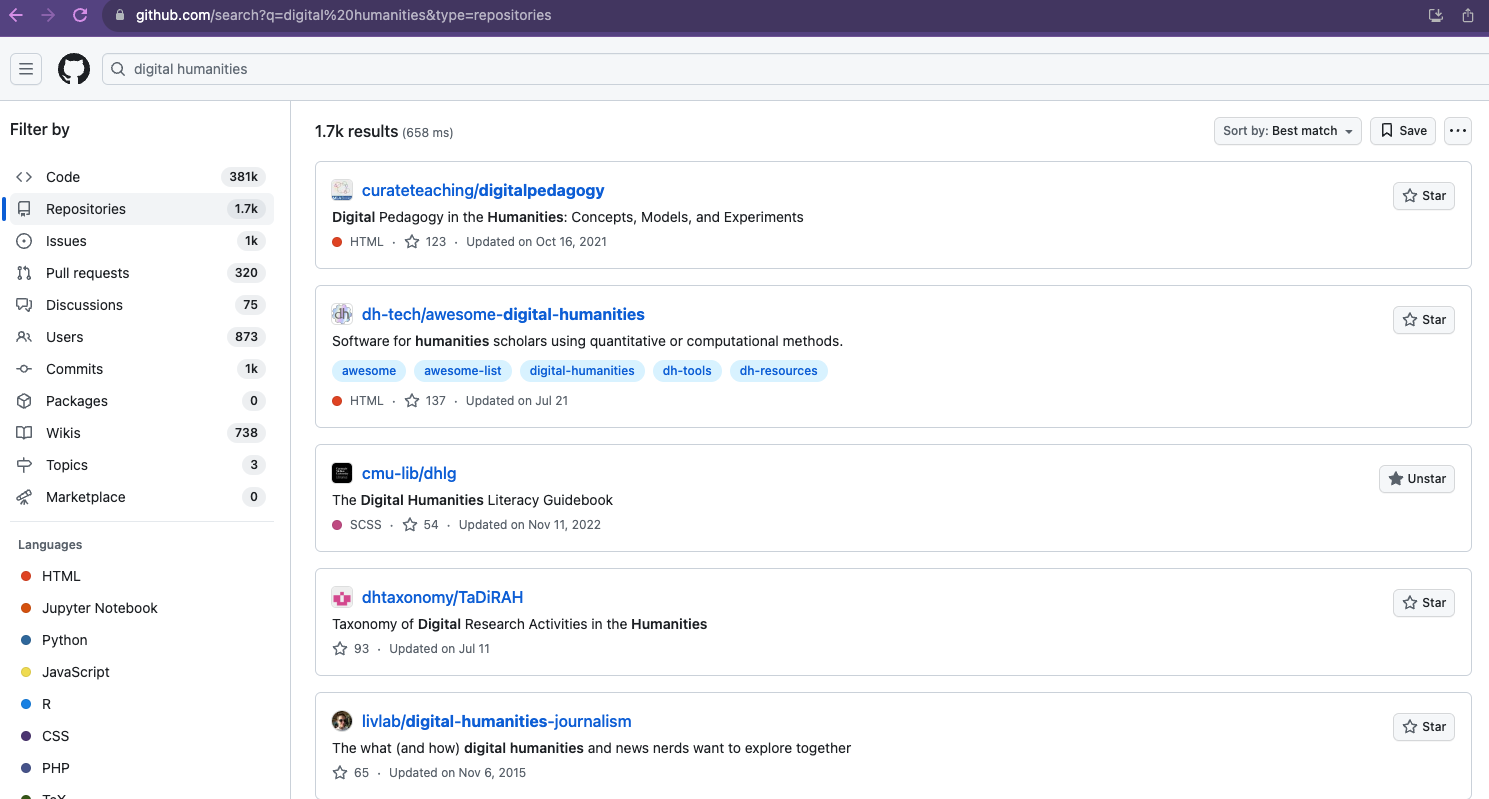
For instance, academic journals like the Programming Historian use GitHub for the entire publishing life cycle (you can explore for yourself https://github.com/programminghistorian/jekyll). You can get a sense of how popular GitHub is for digital humanities through searching for digital-humanities on the platform https://github.com/search?q=digital%20humanities&type=repositories or taking a look at the number of repositories on Github tagged as digital-humanities https://github.com/topics/digital-humanities.
Though this platform is very popular and useful for this course, we will do our best to use it critically and thoughtfully (a mindset we will hopefully bring to our various infrastructures and tools!).
AI Coding with GitHub Co-Pilot
As part of our course, we will be using GitHub’s new AI coding tool called Co-Pilot. Co-Pilot is a tool that uses machine learning to suggest code as you write. It is a bit like the auto-complete feature in Google Docs, but instead of just suggesting words, it suggests entire lines of code. You can read more about it here https://copilot.github.com/.
As a student on GitHub, you should be able to get free access to Co-Pilot. You can read more about how to get access here https://docs.github.com/en/copilot/managing-copilot/managing-copilot-as-an-individual-subscriber/managing-your-copilot-subscription/getting-free-access-to-copilot-as-a-student-teacher-or-maintainer.
Please wait until your GitHub student account has been successfully approved before trying to enable it. It may take a while, so feel free to move on to the other parts of installation as you wait.
If for whatever reason you cannot get access, please let the instructor know and we can try and find a solution. Other tools that may be of use include ChatGPT (the free 3.5 version) or gpt4all (which is a bit more complicated to set up).
VS Code
We will be using Visual Studio Code (VS Code) as our primary code editor for this course. You can download VS Code here https://code.visualstudio.com/
Like GitHub and Co-Pilot, VS Code is also owned by Microsoft, which is why all three work relatively well together. VS Code is something called a Integrated Development Environment (IDE), which is a fancy way of saying it is a program for writing code. You can read more about IDEs here https://en.wikipedia.org/wiki/Integrated_development_environment. Other popular IDEs include Atom, Sublime Text, and PyCharm. While you are welcome to use any IDE you want, I will be using VS Code in this course and I’m not sure that Co-Pilot works with other IDEs, so would highly encourage you to at least test it out.
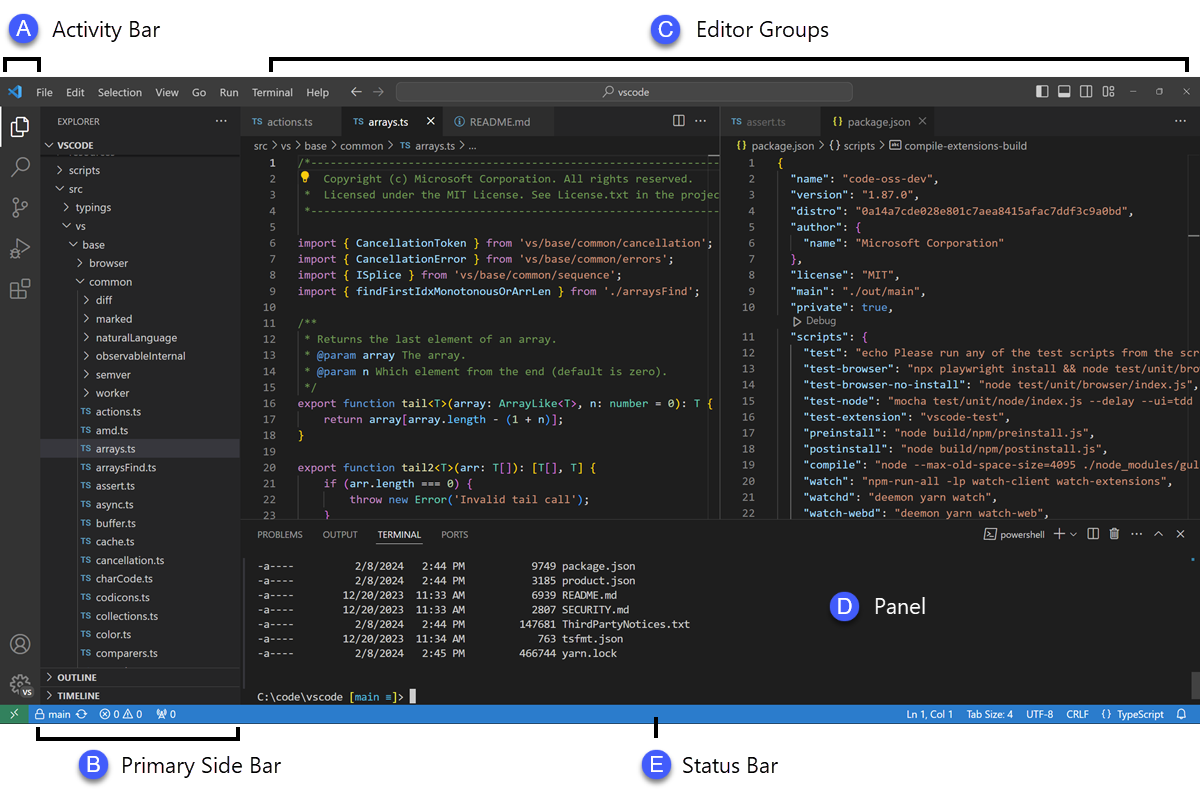
Another benefit of getting used to VS Code is that you can use it in the browser for any Github repository by changing .com to .dev. So for example if you took the link to our reposition, https://github.com/ZoeLeBlanc/is310-computing-humanities-2024 and switched it to https://github.dev/ZoeLeBlanc/is310-computing-humanities-2024, you would see the VS Code version of our repository in the browser.
Installation for Mac Users
For Macs, you will need to check if you have an Intel Chip or an Apple Silicon. You can check this by going to the Apple menu > About This Mac.

You can see in this example the Chip says Apple M2 Pro, which means this is an Apple Silicon. If you see Intel then you have an Intel Chip. Download the appropriate version for your computer through selecting the zip option and then opening and installing the program.
Installation for Windows Users
For Windows, you will need to check if you have a 64-bit or Arm64 operating system. You can check this by going to Settings > System > About and looking at the System type field.
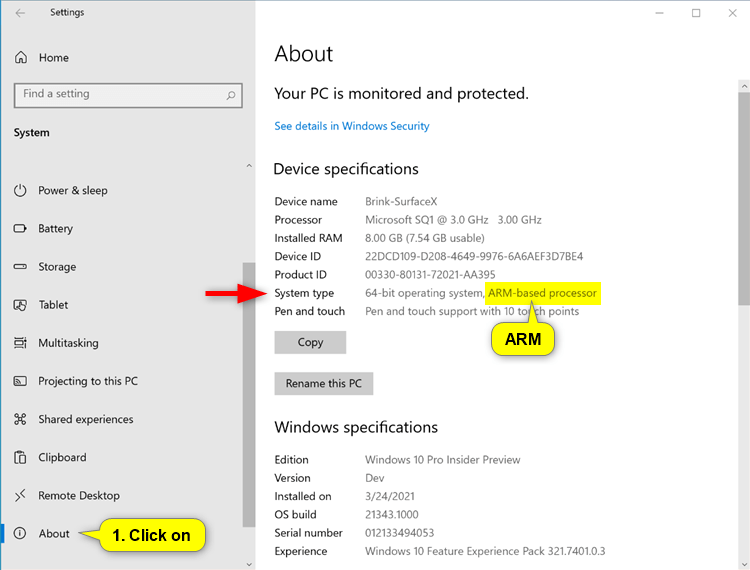
Once identified, you should select the User Installer option and then open and install the program.
VS Code Extensions
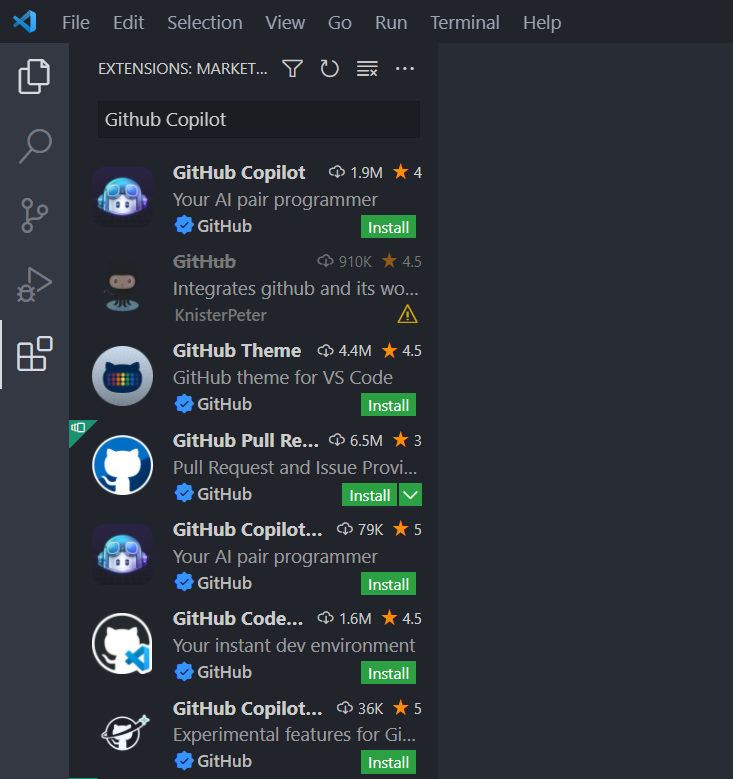
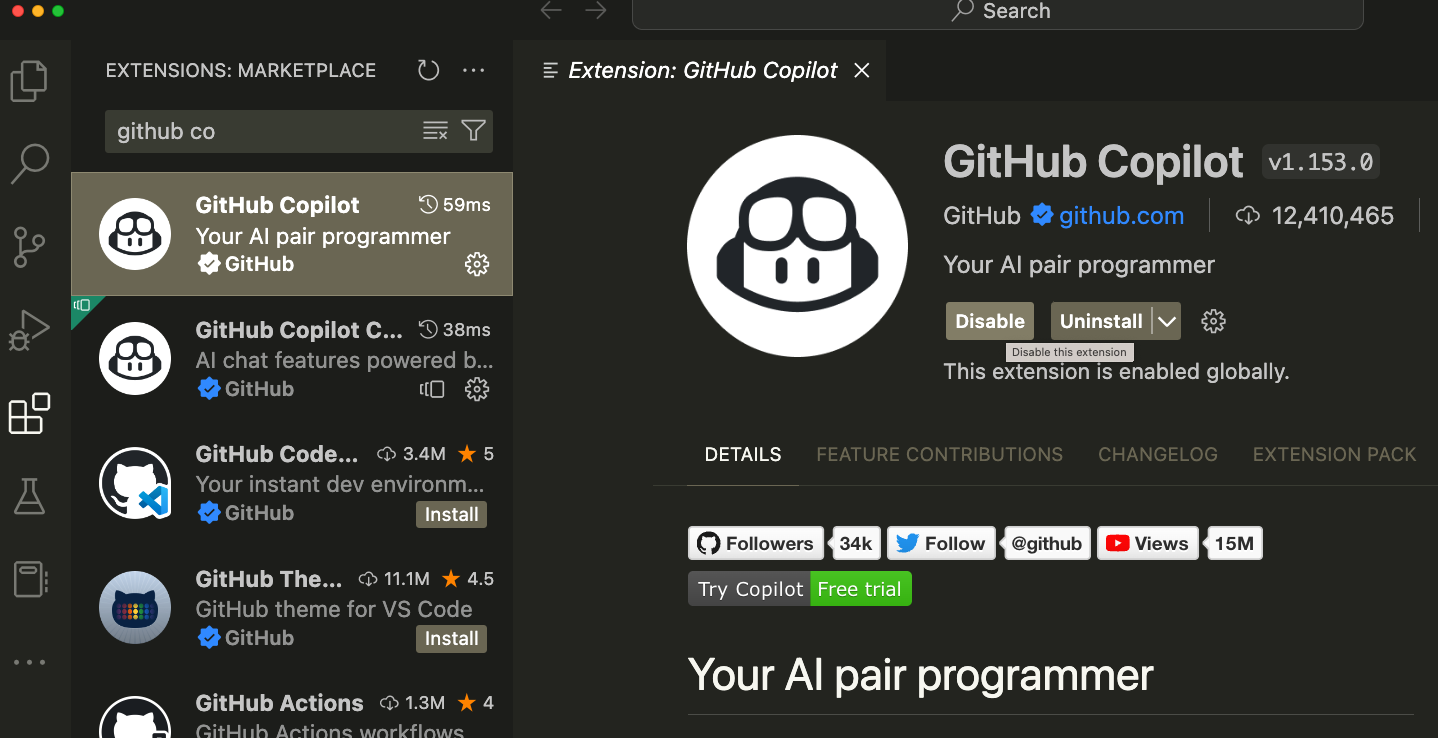
Once you have VS Code installed, you will need to install a few extensions. Extensions are a bit like apps for VS Code, and you can read more about them here https://code.visualstudio.com/docs/editor/extension-gallery. You can install extensions by clicking on the Extensions icon in the left sidebar of VS Code and then searching for your relevant extension. We will be installing various extensions over the course of the semester, but the first one you should install is the GitHub Copilot extension. You can find it by searching for GitHub Copilot in the Extensions Marketplace.
Once you click install, you will need to reload VS Code and then you should be able to use Co-Pilot. We will be learning how to use Co-Pilot with VS Code in the next few weeks, but you can read more about it here https://code.visualstudio.com/docs/editor/github-copilot.
Disabling GitHub Co-Pilot
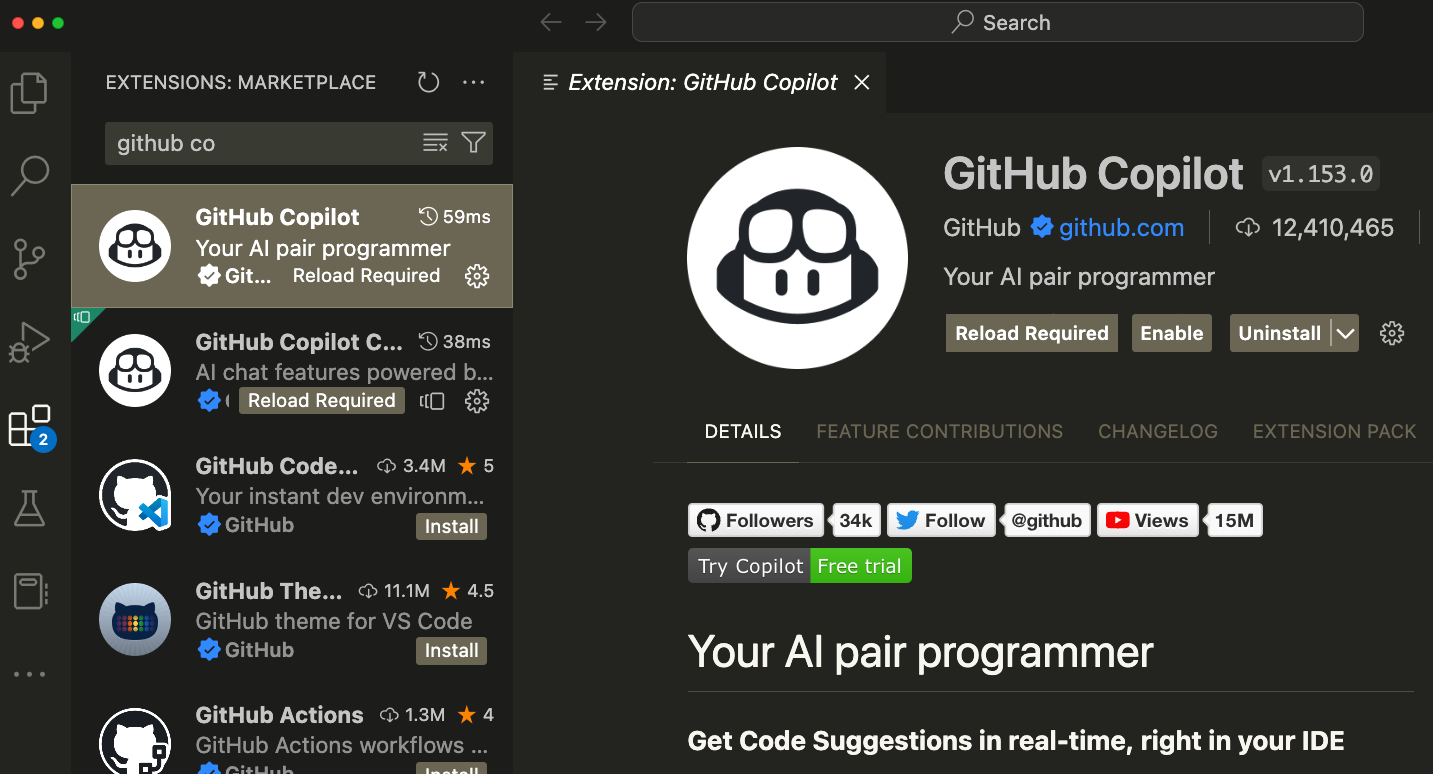
While this class allows you to use AI tools, some of your other coding classes will not. So, if you need to disable Co-Pilot, all you need to do is click the Extensions icon in the left sidebar of VS Code, search for GitHub Copilot, and then click Disable.
Once it is disabled, you will need to reload VS Code. And then you can re-enable it by clicking Enable in the same location.
Python
What is Python?
![]()
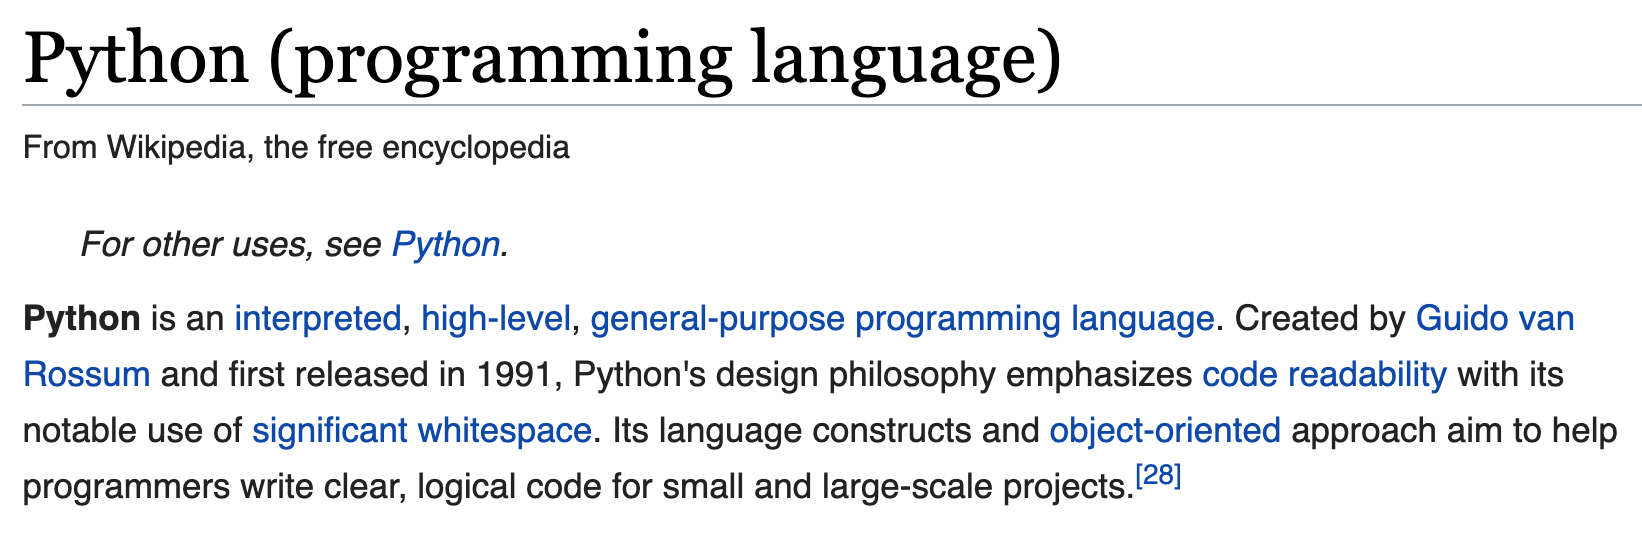
You can read more about Python here https://en.wikipedia.org/wiki/Python_(programming_language) and here https://www.python.org/about/ (also in case you did not know, yes Python is named after the comedic Monty Python series). This course presumes you already have about a semester of experience with Python, if not more, but if you are new to Python, please let the Instructor know and also would highly recommend taking a look at the resources on The Programming Historian https://programminghistorian.org/en/lessons/ and looking at Melanie Walsh, Introduction to Cultural Analytics & Python, https://melaniewalsh.github.io/Intro-Cultural-Analytics/02-Python/00-Python.html.
Why Python?
 |
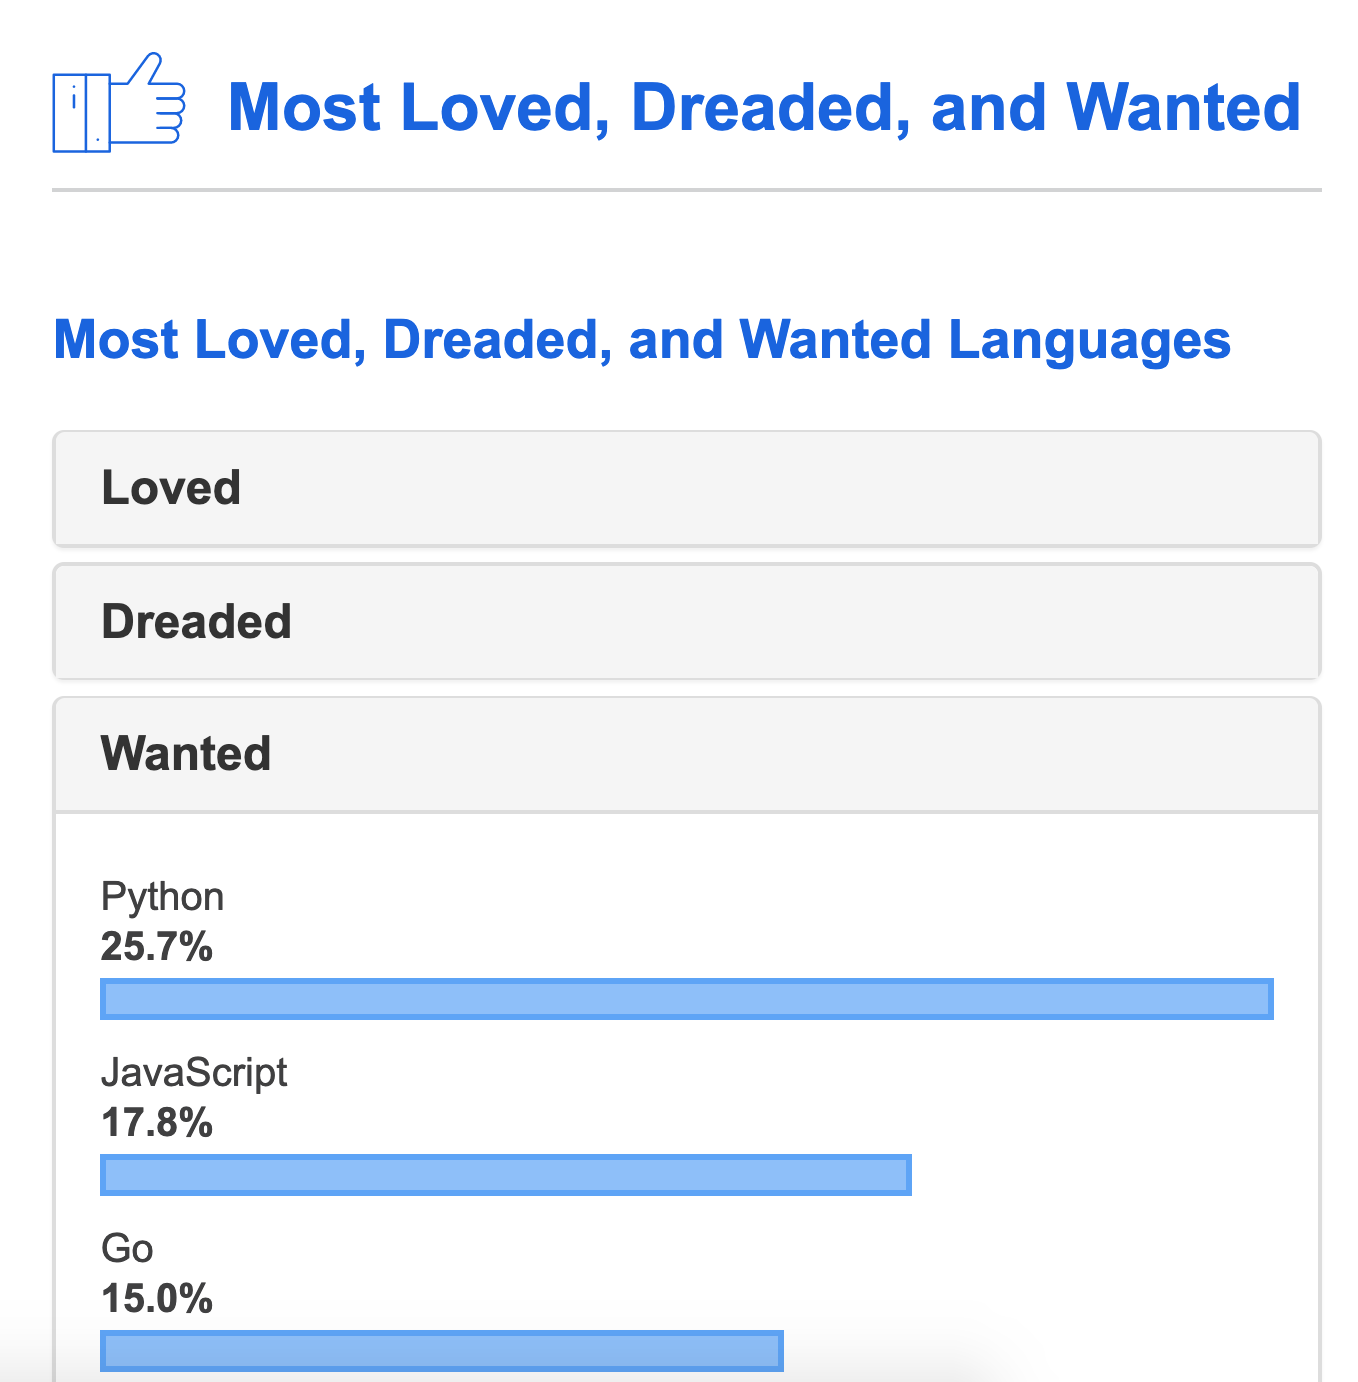 |
|---|---|
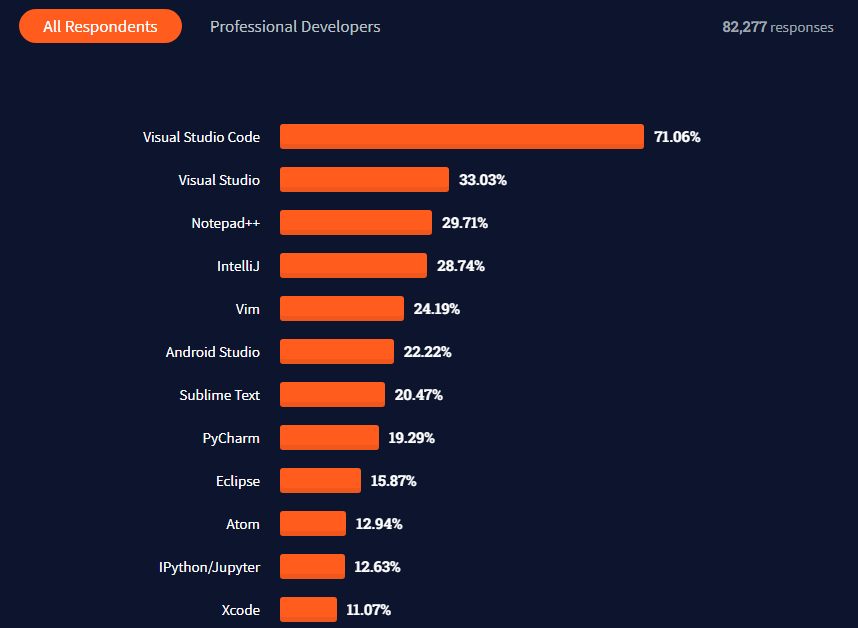
| Jake VanderPlas Tweet | Stack Overflow’s Annual Survey |
In this course, you’ll be writing code in a few different programming languages, but we’ll primarily be using Python. The choice of Python is for a few different reasons. First, Python is well suited to both web development and data analysis – two of the core activities of this course. Second, Python is increasingly becoming a standard in a number of industries and academic disciplines, though other languages like R are also popular. Third is that many of the programming concepts you will learn in Python can transfer relatively well to other programming languages. And finally, Python is a popular language for Digital Humanities research and is used by a number of different DH projects and platforms.
Installing Python
Installing Python and getting it correctly configured is increasingly a very challenging and time consuming task, but I believe it is worthwhile since you will ideally keep coding after this course ends. But I want to forewarn you that this process can be frustrating and time consuming, so please reach out to the instructor if you get stuck or if you are feeling unsure or nervous about this task. To give you a sense of what I mean, here is a comic from xkcd about the Python Environment.

Anaconda is a free and open-source distribution of the Python and R programming languages for scientific computing, that aims to simplify package management and deployment. You can read more about it here https://en.wikipedia.org/wiki/Anaconda_(Python_distribution). You can download Anaconda here https://www.anaconda.com/products/individual. You should be able to use the link above to download Anaconda for Windows, Mac, and Linux.
After downloading the installer, follow this guide https://docs.anaconda.com/anaconda/install/
If successful, you should be able to find a new program on your computer called “Anaconda Prompt”. When you open it, it should say “(base) C:\Users\username>”. This means that it is the base anaconda environment. You should NOT use this environment for general programming or installing packages as it is hard to debug if there are any bugs or mistakes. We will be creating a new anaconda environment, which is essentially a isolated subsection of your computer where we can install different python programs without breaking anything in the rest of the computer.
Run the command: conda create -n is310 python=3.9 pandas nltk scikit-learn jupyter
Respond y to any prompts. When done, you can activate it with: conda activate is310. You can close out anaconda prompt at this point.
Anaconda should also be automatically connected to vscode.
Within VSCode, create a new ipynb notebook by navigating to file, new file, create a ipynb notebook in the center dropdown.
Once you have an empty ipynb, open the environment menu on the left and select the is310 environment.
Run the command “import pandas as pd”. If successful, you are done with setup!
If you run into problems with Anaconda, please consult the TA and instructor. The first few assignments can be completed on Google Colab. Google Colab is a free cloud service that allows you to write and execute Python in your browser. You can read more about it here https://colab.research.google.com/notebooks/intro.ipynb. You will need a Google account to use Colab, but you can use your @illinois.edu email.
CONGRATS YOU’VE SETUP YOUR COMPUTER 🎉
-
For more about this acquistion see Warren, Tom. “Microsoft Confirms It Will Acquire GitHub for $7.5 Billion.” The Verge, June 4, 2018. https://www.theverge.com/2018/6/4/17422788/microsoft-github-acquisition-official-deal. ↩
-
Dohmke, Thomas. “100 Million Developers and Counting.” The GitHub Blog (blog), January 25, 2023. https://github.blog/2023-01-25-100-million-developers-and-counting/. ↩